Example
Here is an example of how to create and publish an metadata profile in Coscine using the Metadata Profile Generator. You should make yourself familiar with the necessary basics under Metadata Profile Generator.
Example: X-ray imaging
For our example project in medicine, we would like to create a resource that allows us to store data on X-ray images. In advance, we have searched for an metadata profile suiting our purposes, but have not found one. So we have to take action ourselves and create such an metadata profile with the generator supplied by Coscine. We use the generic Base profile as a template to build our profile upon.
Step 1: Load existing metadata profile
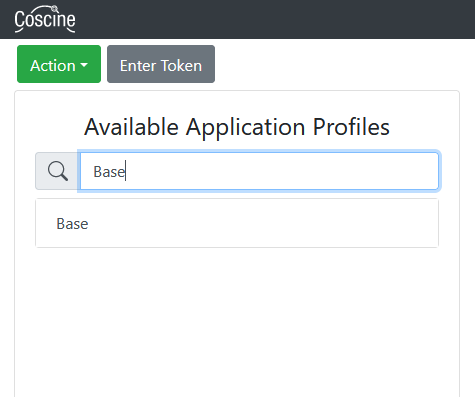
In the "Available metadata profiles" section, we search for the Base metadata profile using the keyword "Base". By clicking on the search result, we can load the metadata profile (depicted in the figure below).
In the detail view we are now able to see all fields of the Base profile (shown in figure below). However, we cannot edit them yet.

Step 2: Switch to the Edit mode
In order to be able to edit the fields of the template metadata profile and to add new ones if necessary, we click on the "Edit->Extend" option in the menu bar under the "Action" tab (menu depicted in the screenshot below). This will copy all the fields of the Base profile into a new customizable metadata profile.

A warning may appear (as shown in the screenshot below) - confirm it by clicking "Next" if you are sure that you would not overwrite any previously done and not yet saved work. Now we can edit the fields of the Base metadata profile. We can add new fields or remove old ones.

Step 3: Configuring metadata profile data
After confirming the warning, an input mask appears in which we must enter metadata for our new metadata profile. Later, we can open this input mask again and again via the gear icon in the detail view, where the metadata for the metadata profile can be stored (see figure below). To make our metadata profile more visible to other users, we create at least one unique title and a meaningful description.

Step 4: Add new specific fields
In addition to the existing fields, we would like to add specific fields. We do this via the "Vocabulary terms" section. In the input field we can search for terms that are already available in other metadata profiles.
Case 1: The required field already exists within the search results (recommended approach)
We would like to add a "description" field, which shall allow users to provide information on data without any formatting restrictions. Via the search option we look for a term "description" and select a suitable result. By clicking on the search result (in this case dc11:description), we add the term to our metadata profile (as depicted in the figure below). The search results are based on the NFDI4Ing terminology service and contain no additional properties such as restrictions on the range of values. Therefore it is recommended to alter the fields by adding additional properties and constraints to facilitate clarity when entering values.
Hint
If the selected term does not appear in the detail view section, it very likely is already contained within our profile - it might just appear under a different name.

Case 2: The required field has not been found in other metadata profiles (takes more time)
In case our requirements are not yet to be found in any other metadata profile and our search would thus end without results, we are able to use the "Add user-defined term" option. In the detail view, we immediately see a new field, which we can customize via the "Field Properties" section.
X-ray images generate some metadata, which is used for the evaluation of the images themselves and, incidentally, for the evaluation of the radiation risk. One parameter that is recorded is the dose area product. The dose area product, abbreviated DAP, is a measurement parameter in dosimetry and the basis for calculating the radiation exposure during an X-ray exposure with an X-ray device.
Background
The search in Coscine is currently limited to NFDI4Ing terminology. As such it may not be able to yield results for medical metadata. The search will be extended in the future.
Term IRI
This property enables us to link to a matching definition of our term located in existing established onotologies/vocabularies. To fill in this field correctly, we will search in established subject-specific vocabularies for the term "Dose Area Product". Helpful search engines for ontologies may be https://prefix.zazuko.com/ or https://lov.linkeddata.es/dataset/lov/.
If we search for "dose area product" via https://lov.linkeddata.es/dataset/lov/ we are prompted with several useful results (depicted in the image below). By clicking on one of the search results we get to an overview of author and description and cross-linkage of the data. Moreover we are able to inspect the data in their raw format. Have we deemed an ontology as fitting for our purposes we can simply copy the link given under each search result and paste it in our metadata profile under the field "Term IRI". In this case we have decided to use the definition of the "Dose Area Product" provided by the ontology "dicom:AcquiredImageAreaDoseProduct" and we thus copy and paste the link "http://purl.org/healthcarevocab/v1#Tag.0018.9473" into "Term IRI".
Hint
By default the Term IRI is automatically filled by the metadata profile with a generic purl-URL. However this should only be used in novel fields, that are not defined in an already established ontology. Using established vocabularies is important for storing data according to the FAIR principles (Findable, Accessible, Interoperable, Re-usable). Therefore metadata profiles without a valid Term IRI may be rejected during the review-process by the Coscine team.

Additional field properties
To record the DAP for an X-ray exposure, we customize our newly created field by specifying the following additional properties:
Dose Area Product standard properties
| Property | Value | Explanation |
|---|---|---|
| Term IRI | http://purl.org/healthcarevocab/v1#Tag.0018.9473 | Pre-filled for new terms / fitting ontology-URL |
| Field Name | Dose Area Product [dGy*cm^2] | Meaningful name for our field; Include units of measurement in [] in the title, if applicable, for example: "Length [cm]" |
| Minimum Required Entries | 1 | The DAP parameter is recorded for each x-ray image |
| Maximum Required Entries | 1 | Only one DAP parameter is recorded for each x-ray image |
| Property Type | Datatype | Our field represents a decimal number |
| Datatype | decimal | We expect a decimal number as value |
Under "Show String Properties" we also specify a regular expression to ensure that values entered in the field conform to the correct format:
| Property | Value | Explanation |
|---|---|---|
| Regex Pattern | ^[1-9]\d*(.\d+)?$ | Decimal number with a point as decimal delimiter |
To ensure that the user also understands what is meant by the field and which unit the data must conform to, we adjust the administrative properties of the field:
Administrative Properties
| Property | Value | Explanation |
|---|---|---|
| Description | Dose Area Product in dGy*cm^2 | The DAP shall be specified as Dezi-Grays * centimeter squared |
| Error message | Decimal number expected | Error message displayed in case the user enters an invalid value |
| Error severity | Violation | The field is invalid if the specified value does not conform to the regex pattern defined above |
If you hover over the "i", a description of the field will appear (see Figure 7).

Step 5: Test the metadata profile
Our field is now configured. We can test the result using the preview tool in the detail view.
If we enter a value in the wrong format, the previously defined error message will be displayed (as shown in the figure below).

If we enter data in the correct format, the correctness is confirmed by a green check mark (as can be seen in the screenshot given below).

Step 6: Saving the metadata profile
Once the metadata profile has been completed, or if you wish to continue working on it at a later date, it must be downloaded locally via ‘Download Code’ as it cannot be saved in the metadata profile generator (see illustration below). Your browser will download the current status of the metadata profile in RDF format (file extension .ttl). To reload it at a later date, switch to the ‘Code View’ and copy the contents of the downloaded file into the text field in the detail view. You can then click on the ‘Code View’ button again to return to the standard view and continue working.


Step 7: Request for publication of the metadata profile
Clicking ‘Send’ will send the metadata profile to the Coscine team for review and publication (see image above). You will then receive a confirmation email at the email address stored in your Coscine user profile.
Review of the metadata profile (especially with regard to the ‘Term IRI’ information, see above) can take up to four weeks. You will receive an email as soon as your metadata profile has been uploaded to Coscine.